Navigating the Digital Seas with Scanning & Enumeration! 🕵️♀️🔍 (Part 1)

Hey there, future cybersecurity rockstars! 👋 Welcome back to our “Pentesting 101” crash course. We’ve already sharpened our swords with Planning & Scoping and navigated the misty jungles of Reconnaissance. Now, it’s time to get up close and personal with our target in the exhilarating Scanning & Enumeration phase!
Think of it as putting on your detective hat and using high-tech gadgets to reveal secrets. This isn’t just about running a few commands; it’s about understanding the digital pulse of your target, finding its open doors, and peeking through its windows to see what vulnerabilities might be lurking inside.
In this first part, we’ll cover the basics of understanding the scanning phase, network discovery, and port scanning. Let’s dive in! 🚀
1. Understanding the Scanning Phase: Your Digital X-Ray Vision! 👁️🗨️
After passively gathering intel during reconnaissance, the scanning phase is where we start interacting directly (but carefully!) with the target. This is where the magic happens – we use specialized tools to map out networks, identify live hosts, discover open ports, and enumerate services.
Why Scanning Matters 🌟
Imagine trying to pick a lock you’ve never seen. You wouldn’t blindly stick a pick in, right? You’d first understand the mechanism and check for weak points.
That’s exactly what scanning does. It transforms passive reconnaissance into actionable intelligence, identifies vulnerabilities tied to specific services, maps all potential entry points for exploitation, and makes your efforts targeted and efficient. Without proper scanning, you’re essentially working blind, which wastes time and increases the risk of missing critical vulnerabilities.
Passive vs. Active Scanning: The Art of Interaction 💡
Not all scans are created equal! Understanding the difference between passive and active scanning is crucial for maintaining operational security and avoiding detection.
| Scanning Type | Passive Scanning | Active Scanning |
|---|---|---|
| Interaction Level | No direct contact with target | Direct packet exchange with target |
| Detection Risk | Very low to none | Medium to high |
| Information Depth | Limited but safe | Comprehensive and detailed |
| Common Tools | Shodan, Maltego, Censys, Google Dorking | Nmap, Nikto, OpenVAS, Metasploit |
| Best Use Case | Initial reconnaissance, sensitive targets | Authorized testing, detailed assessment |
Passive Scanning is like eavesdropping from afar. You’re collecting information without directly interacting with the target in a way that might be logged or noticed. This involves analyzing public information such as DNS records, WHOIS data, certificate transparency logs, or using search engines. The main benefit is the extremely low risk of detection, though you’re limited in the depth of information you can gather.
Active Scanning involves directly sending packets to the target system and observing its responses. It’s like knocking on every door and listening for who answers. This includes sending ping requests, attempting to connect to ports, and sending crafted packets to elicit responses. While this provides detailed, real-time information about the target’s live status, open ports, running services, and potential vulnerabilities, it can be detected by intrusion detection systems (IDS) or logging mechanisms.
Ethical Considerations and Legal Boundaries: Play by the Rules! ⚖️
Before you unleash your scanning tools, remember: With great power comes great responsibility! 🦸♂️
The golden rule of ethical hacking is simple yet absolute: always get permission. Never scan a system you don’t have explicit, written permission to scan. Unauthorized scanning is illegal and can lead to severe legal consequences including fines and imprisonment. Even with permission, stick strictly to the defined scope. If you’re told to scan IPs 192.168.1.1-100, don’t venture into 192.168.2.x territory.
Additionally, understand that active scanning can sometimes crash old or unstable services. Be aware of the potential impact on live production systems and plan accordingly. While not foolproof, consider using VPNs or proxy chains when performing scans, especially if you’re not operating from a controlled test environment.
2. Network Discovery: Mapping the Digital Landscape 🗺️
Before we can knock on doors, we need to know which houses are actually occupied in the neighborhood! Network discovery is about finding live hosts (computers, servers, devices) on a given network segment.
Identifying Live Hosts: Who’s Home? 🏠
1. Ping (ping): The Classic Heartbeat Check!
The ping command is one of the oldest and most fundamental network diagnostic tools. It sends an Internet Control Message Protocol (ICMP) echo request packet to a host and waits for an ICMP echo reply. If you get a reply, the host is likely alive. ICMP is a supporting protocol in the Internet protocol suite used by network devices to send error messages and operational information.
Example:
1
2
3
4
5
6
7
8
# Basic ping to a single host
ping -c 4 192.168.1.1

# Ping sweep across a range (using fping for efficiency)
fping -g 192.168.1.1 192.168.1.254

# Ping with specific timeout and packet size
ping -c 3 -W 2 -s 64 target.example.com
Sample Output:
1
2
3
4
5
6
7
8
9
PING 192.168.1.1 (192.168.1.1) 56(84) bytes of data.
64 bytes from 192.168.1.1: icmp_seq=1 ttl=64 time=0.234 ms
64 bytes from 192.168.1.1: icmp_seq=2 ttl=64 time=0.198 ms
64 bytes from 192.168.1.1: icmp_seq=3 ttl=64 time=0.176 ms
64 bytes from 192.168.1.1: icmp_seq=4 ttl=64 time=0.201 ms

--- 192.168.1.1 ping statistics ---
4 packets transmitted, 4 received, 0% packet loss, time 3006ms
rtt min/avg/max/mdev = 0.176/0.202/0.234/0.021 ms
The TTL (Time To Live) value in the output can give hints about the operating system: Linux/Unix systems typically use TTL 64, Windows systems use TTL 128, and network devices often use TTL 255.
Note: Many networks block ICMP echo requests (pings) for security reasons, so a lack of response doesn’t always mean the host is down.
2. ARP-Scan (arp-scan): The Local Network Champion!
For local networks (LANs), arp-scan is a gem! It uses the Address Resolution Protocol (ARP) to discover hosts. ARP is a protocol used to discover the link layer address (MAC address) associated with a given network layer address (IP address). Since ARP operates at Layer 2 of the OSI model, it works within the same broadcast domain and cannot be easily blocked without breaking network functionality.
Examples:
1
2
3
4
5
6
7
8
9
10
11
# Scan the local network
sudo arp-scan --localnet

# Scan a specific subnet
sudo arp-scan 192.168.1.0/24

# Scan with interface specification
sudo arp-scan -I eth0 192.168.1.0/24

# Scan with custom timing (faster)
sudo arp-scan --bandwidth=1000000 192.168.1.0/24
Sample Output:
1
2
3
4
5
6
7
8
9
Interface: eth0, datalink type: EN10MB (Ethernet)
Starting arp-scan 1.9.7 with 256 hosts (https://github.com/royhills/arp-scan)
192.168.1.1     aa:bb:cc:dd:ee:ff       Netgear
192.168.1.15    11:22:33:44:55:66       Apple, Inc.
192.168.1.25    77:88:99:aa:bb:cc       Dell Inc.
192.168.1.100   ff:ee:dd:cc:bb:aa       VMware, Inc.

4 packets received by filter, 0 packets dropped by kernel
Ending arp-scan 1.9.7: 256 hosts scanned in 2.15 seconds (119.07 hosts/sec)
The MAC address (Media Access Control address) is a unique identifier assigned to network interfaces. The first three octets (aa:bb:cc in the example) identify the manufacturer through the Organizationally Unique Identifier (OUI).
Note: ARP works even when ICMP is blocked and reveals MAC addresses (showing device manufacturers).
3. Netdiscover: The Interactive Discovery Tool
Another handy tool for active/passive ARP reconnaissance on wireless or wired networks. Netdiscover can operate in passive mode, making it excellent for stealthy reconnaissance on shared network segments.
Examples:
1
2
3
4
5
6
7
8
# Active scan on specific network
sudo netdiscover -i eth0 -r 192.168.1.0/24

# Passive mode (just listen to ARP traffic)
sudo netdiscover -i wlan0 -p

# Fast scan mode
sudo netdiscover -r 10.0.0.0/16 -f
Understanding Subnetting and CIDR Notation: The Digital Neighborhoods 🏘️
To effectively scan a network, you need to understand how networks are segmented. CIDR (Classless Inter-Domain Routing) notation is a method for allocating IP addresses and routing. It’s written as IP_address/prefix_length (e.g., 192.168.1.0/24).
| CIDR Notation | Subnet Mask | Total IPs | Usable Hosts | Common Use |
|---|---|---|---|---|
| /8 | 255.0.0.0 | 16,777,216 | 16,777,214 | Large organizations |
| /16 | 255.255.0.0 | 65,536 | 65,534 | Medium organizations |
| /24 | 255.255.255.0 | 256 | 254 | Small networks/VLANs |
| /25 | 255.255.255.128 | 128 | 126 | Subnet division |
| /30 | 255.255.255.252 | 4 | 2 | Point-to-point links |
| /32 | 255.255.255.255 | 1 | 1 | Host route |
Subnet Calculator Example:
1
2
3
4
5
6
7
8
9
10
# Using ipcalc to understand subnets
ipcalc 192.168.1.0/24

# Output:
# Network:   192.168.1.0/24
# Netmask:   255.255.255.0 = 24
# Broadcast: 192.168.1.255
# HostMin:   192.168.1.1
# HostMax:   192.168.1.254
# Hosts/Net: 254
The network address (192.168.1.0) and broadcast address (192.168.1.255) are reserved and cannot be assigned to hosts. This is why a /24 network has 254 usable addresses instead of 256.
Analyzing Network Topology: Drawing the Map 🗺️
The goal of network discovery isn’t just to find hosts but to build a mental (or actual) map of how the network is structured. Understanding network topology helps you identify critical infrastructure, potential pivot points, and security boundaries.
When analyzing topology, focus on identifying device roles such as routers (typically at .1 or .254 addresses), switches, firewalls, servers, and workstations. Pay attention to connectivity patterns to understand which subnets can communicate with each other and where security boundaries exist. Sometimes finding one live host can reveal another previously unknown network segment through routing tables or ARP caches.
3. Port Scanning: Knocking on Every Door! 🚪🕵️♂️
Once we know which hosts are alive, the next logical step is to see what services they are offering. Every application or service that wants to communicate over a network uses a specific port number. Ports are 16-bit numbers (0-65535) that help direct network traffic to the correct application on a host.
| Port Range | Description | Assignment |
|---|---|---|
| 0-1023 | Well-known ports | Assigned by IANA for standard services |
| 1024-49151 | Registered ports | Can be registered for specific services |
| 49152-65535 | Dynamic/Private ports | Used for temporary connections |
Common well-known ports include HTTP (80), HTTPS (443), SSH (22), FTP (21), Telnet (23), SMTP (25), DNS (53), and RDP (3389).
Types of Scans: The Many Ways to Knock 💥
1. SYN Scan (Half-Open Scan) -sS
The most common and often preferred scan type due to its speed and stealth. Also known as a “stealth scan,” it’s the default scan type when Nmap is run with root privileges.
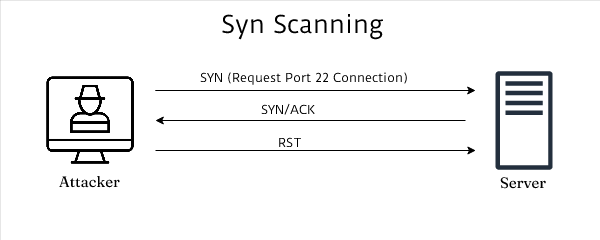 TCP three-way handshake vs SYN scan process
How it works:
The normal TCP three-way handshake consists of SYN → SYN-ACK → ACK. However, a SYN scan interrupts this process. The scanner sends a SYN packet to initiate a connection. If the port is open, the target responds with SYN-ACK, indicating it’s ready to complete the handshake. Instead of completing the connection with an ACK, the scanner sends an RST (reset) packet, terminating the connection attempt. Since the connection is never fully established, it’s called “half-open” and is less likely to be logged by the target system.
Examples:
1
2
3
4
5
6
7
8
9
10
11
# Basic SYN scan
nmap -sS 192.168.1.100

# SYN scan with common ports
nmap -sS --top-ports 1000 192.168.1.100

# SYN scan with specific ports
nmap -sS -p 22,80,443,8080 192.168.1.100

# SYN scan with timing template
nmap -sS -T4 192.168.1.100
2. ACK Scan -sA: Firewall Rule Mapping
Used primarily for firewall rule set mapping and identifying stateless firewalls. ACK scans don’t determine whether ports are open or closed but rather whether they are filtered or unfiltered by a firewall.
 Visual representation of ACK Scan
Examples:
1
2
3
4
5
6
7
8
# ACK scan to test firewall rules
nmap -sA 192.168.1.100

# ACK scan on specific ports
nmap -sA -p 1-1000 192.168.1.100

# ACK scan with packet tracing
nmap -sA --packet-trace 192.168.1.100
3. UDP Scan -sU: The Connectionless Challenge
For scanning User Datagram Protocol (UDP) ports. UDP is a connectionless protocol that doesn’t use a handshake like TCP. This makes UDP scanning significantly slower and less reliable than TCP scanning.
UDP services are often critical for network infrastructure (DNS, DHCP, SNMP) but are frequently overlooked during security assessments. When a UDP packet is sent to a closed port, the target typically responds with an ICMP port unreachable message. Open UDP ports often don’t respond at all, making them difficult to distinguish from filtered ports.
Examples:
1
2
3
4
5
6
7
8
# UDP scan (slow but thorough)
sudo nmap -sU 192.168.1.100

# UDP scan on common ports
sudo nmap -sU --top-ports 100 192.168.1.100

# Combined TCP and UDP scan
sudo nmap -sS -sU -p T:1-1000,U:53,161,500 192.168.1.100
4. Using Nmap Effectively: Your Best Friend in Scanning! 🤩
Nmap (Network Mapper) is the go-to tool for port scanning and network discovery. Created by Gordon Lyon (Fyodor), it has become the de facto standard for network exploration and security auditing.
Basic Scanning Examples
1
2
3
4
5
6
7
8
9
10
11
12
# Simple scan
nmap 192.168.1.100

# Scan multiple hosts
nmap 192.168.1.1-254
nmap 192.168.1.1,50,100

# Scan from file
nmap -iL targets.txt

# Exclude hosts
nmap 192.168.1.0/24 --exclude 192.168.1.1,192.168.1.254
Advanced Scanning Techniques
1
2
3
4
5
6
7
8
9
10
11
12
13
14
# Aggressive scan (OS detection, version detection, script scanning, traceroute)
nmap -A 192.168.1.100

# Scan all ports
nmap -p- 192.168.1.100

# Fast scan (top 100 ports)
nmap -F 192.168.1.100

# Intense scan with timing
nmap -T4 -A -v 192.168.1.100

# Stealth scan
nmap -sS -T2 -f 192.168.1.100
Service and Version Detection
Service detection (-sV) sends a series of probes to identified open ports to determine what service and version is running. This is crucial for vulnerability assessment as specific versions often have known vulnerabilities.
1
2
3
4
5
6
7
8
9
10
11
# Version detection
nmap -sV 192.168.1.100

# Aggressive version detection
nmap -sV --version-intensity 9 192.168.1.100

# Service detection with scripts
nmap -sC 192.168.1.100

# Custom script execution
nmap --script=http-enum 192.168.1.100
Output and Reporting
Nmap supports multiple output formats for different use cases. Normal output (-oN) is human-readable, XML output (-oX) is ideal for parsing by other tools, and Grepable output (-oG) is perfect for quick searches.
1
2
3
4
5
6
7
8
9
10
# Save output in all formats
nmap -A 192.168.1.100 -oA complete_scan

# Save in specific formats
nmap -sS 192.168.1.100 -oN normal_output.txt
nmap -sS 192.168.1.100 -oX xml_output.xml
nmap -sS 192.168.1.100 -oG grepable_output.gnmap

# Verbose output
nmap -v -sS 192.168.1.100
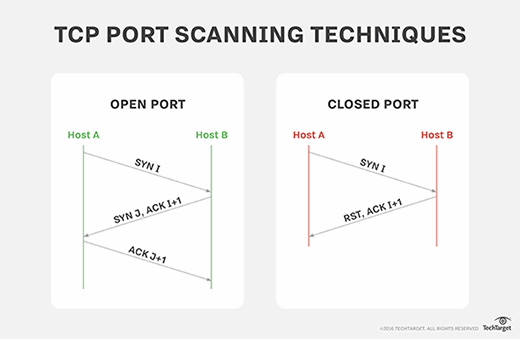
Identifying Open, Closed, and Filtered Ports: What the Responses Mean 🚦
When Nmap returns results, it classifies ports into different states based on the responses received:
| Port State | Description | What It Means | TCP Response |
|---|---|---|---|
| Open | Service actively listening | Vulnerable to exploitation | SYN-ACK received |
| Closed | No application listening | Host is reachable | RST received |
| Filtered | Firewall/filter blocking | Security device present | No response or ICMP error |
| Unfiltered | ACK scan can reach | Used with ACK scan | RST received |
| Open|Filtered | Cannot determine state | UDP scan ambiguity | No response |
| Closed|Filtered | Cannot determine if closed or filtered | Rare state | ICMP errors |
Real-World Example Output
1
2
3
4
5
6
7
8
9
10
11
12
13
14
15
16
17
18
19
20
21
22
23
24
25
# Command
nmap -A -T4 scanme.nmap.org

# Sample Output
Starting Nmap 7.94 ( https://nmap.org ) at 2025-06-16 10:30 GMT
Nmap scan report for scanme.nmap.org (45.33.32.156)
Host is up (0.065s latency).
Other addresses for scanme.nmap.org (not scanned): 2600:3c01::f03c:91ff:fe18:bb2f
Not shown: 996 closed ports
PORT      STATE SERVICE    VERSION
22/tcp    open  ssh        OpenSSH 6.6.1p1 Ubuntu 2ubuntu2.13 (Ubuntu Linux; protocol 2.0)
| ssh-hostkey:
|   1024 ac:00:a0:1a:82:ff:cc:55:99:dc:67:2b:34:97:6b:75 (DSA)
|   2048 20:3d:2d:44:62:2a:b0:5a:9d:b5:b3:05:14:c2:a6:b2 (RSA)
|   256 96:02:bb:5e:57:54:1c:4e:45:2f:56:4c:4a:24:b2:57 (ECDSA)
|_  256 33:fa:91:0f:e0:987:31:c5:92:25:44:65:99:67:27:24 (ED25519)
80/tcp    open  http       Apache httpd 2.4.7 ((Ubuntu))
|_http-server-header: Apache/2.4.7 (Ubuntu)
|_http-title: Go ahead and ScanMe!
9929/tcp  open  nping-echo Nping echo
31337/tcp open  tcpwrapped
Service Info: OS: Linux; CPE: cpe:/o:linux:linux_kernel

Service detection performed. Please report any incorrect results at https://nmap.org/submit/ .
Nmap done: 1 IP address (1 host up) scanned in 8.42 seconds
The output provides valuable information including service versions (OpenSSH 6.6.1p1, Apache 2.4.7), operating system details (Ubuntu Linux), SSH host keys for fingerprinting, and Common Platform Enumeration (CPE) identifiers for vulnerability lookups.
Practical Scanning Scenarios
Scenario 1: Web Application Testing
1
2
3
4
5
# Comprehensive web server scan
nmap -sS -sV -p 80,443,8080,8443 --script=http-* target.com

# SSL/TLS testing
nmap -sS -p 443 --script=ssl-* target.com
Scenario 2: Internal Network Assessment
1
2
3
4
5
# Complete internal network scan
nmap -sS -A -T4 -oA internal_scan 192.168.1.0/24

# Database service discovery
nmap -sS -p 1433,1521,3306,5432 --script=*-info 192.168.1.0/24
Scenario 3: Stealth Reconnaissance
1
2
3
4
5
# Ultra-stealth scan
nmap -sS -T1 -f --data-length 25 -D RND:10 target.com

# Fragmented packets
nmap -sS -f -ff target.com
Performance Optimization and Best Practices 🚀
Timing Templates
Nmap provides timing templates that control the speed and aggressiveness of scans. Each template adjusts multiple timing parameters simultaneously:
| Template | Name | Description | Use Case |
|---|---|---|---|
| T0 | Paranoid | 5 min between packets | IDS evasion, extremely sensitive targets |
| T1 | Sneaky | 15 sec between packets | Avoiding detection, low priority scans |
| T2 | Polite | 0.4 sec between packets | Busy networks, being respectful |
| T3 | Normal | Default timing | General purpose scanning |
| T4 | Aggressive | Fast, reliable networks | Internal networks, authorized tests |
| T5 | Insane | Assumes perfect network | Lab environments only |
1
2
3
4
5
6
7
# Examples of each timing template
nmap -T0 target.com  # Paranoid - Very slow, for IDS evasion
nmap -T1 target.com  # Sneaky - Slow, less likely to be detected
nmap -T2 target.com  # Polite - Slower to avoid congestion
nmap -T3 target.com  # Normal - Default timing
nmap -T4 target.com  # Aggressive - Fast, assumes reliable network
nmap -T5 target.com  # Insane - Very fast, may miss results
Parallel Processing
1
2
3
4
5
6
7
8
# Adjust parallelism
nmap --min-parallelism 100 --max-parallelism 300 target.com

# Host timeout settings
nmap --host-timeout 5m target.com

# Scan delay (for rate limiting)
nmap --scan-delay 1s target.com
5. Common Challenges and Solutions 🛠️
Firewall Evasion Techniques
Modern firewalls and IDS/IPS systems have become sophisticated at detecting port scans. Here are techniques to evade detection:
Decoy Scanning involves spoofing multiple source IPs to hide your real IP among the decoys. The target sees scans from multiple sources, making it difficult to identify the real attacker.
1
2
3
4
5
6
7
8
9
10
11
12
13
14
# Decoy scanning
nmap -D 192.168.1.5,192.168.1.10,ME 192.168.1.100

# Source port specification (using common ports)
nmap --source-port 53 192.168.1.100

# Fragment packets
nmap -f 192.168.1.100

# Custom MTU size
nmap --mtu 16 192.168.1.100

# Spoof MAC address
nmap --spoof-mac Apple 192.168.1.100
Dealing with Rate Limiting
Many systems implement rate limiting to prevent scanning. When encountering rate limits, adjust your scanning strategy by slowing down the scan rate and randomizing the order of hosts and ports scanned.
1
2
3
4
5
# Slow scan to avoid detection
nmap -T1 --scan-delay 2s 192.168.1.100

# Randomize host order
nmap --randomize-hosts 192.168.1.0/24
Next Steps and Advanced Techniques 🔮
You’ve successfully completed the first part of your scanning and enumeration crash course! You now understand core concepts of scanning phases, network discovery techniques, various port scanning methods, Nmap mastery fundamentals, and ethical considerations with legal boundaries.
What’s Coming in Part 2
In the next installment, we’ll dive deeper into Service Enumeration, exploring how to extract detailed information from discovered services. You’ll learn OS Fingerprinting techniques to identify target operating systems accurately. We’ll explore Automated Vulnerability Scanning using tools like OpenVAS and Nessus for comprehensive security assessments. Advanced Evasion Techniques will teach you how to bypass sophisticated defenses and IDS/IPS systems. You’ll master Results Analysis to make sense of vast amounts of scan data and prioritize findings. Finally, Target Prioritization will help you focus on high-value targets and critical vulnerabilities.
Resources and Further Learning 📚
Essential Tools
For continued learning and practice, familiarize yourself with these essential tools. The Nmap Official Documentation is your comprehensive guide to all things Nmap. The Nmap Scripting Engine (NSE) documentation covers hundreds of scripts for specialized scanning. Masscan offers high-speed port scanning for large networks, while Zmap enables internet-wide scanning capabilities for research purposes.
Practice Environments
Theory without practice is incomplete. VulnHub provides vulnerable VMs designed for penetration testing practice. HackTheBox offers online penetration testing labs with active machines and retired challenges. TryHackMe provides guided cybersecurity learning paths perfect for beginners.
Legal Testing Targets
Always practice ethically and legally. Use scanme.nmap.org, the official Nmap test server designed for scanning practice. Set up your own lab environment using virtualization for unlimited practice. Participate in bug bounty programs that explicitly allow port scanning within their defined scope.
Remember: Always obtain explicit permission before scanning any systems you don’t own. Unauthorized scanning is illegal and unethical. The techniques discussed here are powerful tools that must be used responsibly and only for legitimate security testing purposes.
Stay curious, stay ethical, and keep hacking! 💻🔥